To plant a palm tree, dig a hole about twice as wide as the rootball and no deeper than it. Set the palm so the top of the roots sits about 1 inch below the soil surface. Backfill with native soil, water it in well, brace large palms without nailing into the trunk, and water on a schedule for months.
The steps below follow the University of Florida IFAS Extension palm transplanting guide. We use them on every palm install in Flagler County, where sandy soil, summer storms, and salt air leave little room for error. A palm planted too deep or braced the wrong way can struggle for years, while one planted right usually roots fast and grows strong.
Best Time to Plant a Palm in Florida
The rainy season, June through November, gives most Florida palms their best chance at survival after transplanting, since warm soil and regular rain help new roots grow. That is the window we aim for when a homeowner can choose the timing.
Container-grown palms are more flexible, and you can plant them outside the rainy season if you water them well. Field-grown palms lose more roots at digging and need more care after planting. For winter plantings in Palm Coast, plan around cold nights. Our guide on how to winterize your garden covers the cold-season steps in more detail.
Container-Grown vs Field-Grown Palms
A container-grown palm grew in a pot, so its roots sit in a compact ball of potting mix. A field-grown palm grew in the ground and was dug up, so it lost many roots at digging and must regrow them. That difference shapes how often you water and how fast the palm settles in.
Container palms usually establish faster because their roots stay intact. Field-grown palms need steadier moisture and more patience, since they must regrow roots before pushing much new top growth. If you are still picking a palm, start with our guide to the best palm trees for landscaping. King palms are one popular Palm Coast choice, and they follow the same planting rules as other palms here.
Tools and Materials
Gather your gear before you dig, so the palm spends as little time as possible out of its container. You will need a sharp shovel, a measuring tape, a garden hose, and mulch. For large palms, add short 2×4 pieces, straps to hold them to the trunk, and longer timbers for braces. Keep pruners handy for cabbage palm leaf removal.
Before you dig anywhere, call Sunshine 811 at least two full business days ahead. The free service marks buried utility lines so you do not hit one. This step is not optional: a cut cable or pipe turns a simple planting job into a costly repair. You can reach them through Sunshine 811.
How to Plant a Palm Tree, Step by Step
Work through these steps in order, and take your time with depth and bracing, since those two steps cause the most long-term trouble when they go wrong.
Step 1: Call 811 and Pick the Spot
Call Sunshine 811 at least two full business days before you dig, then wait for the marks before you break ground. While you wait, pick the spot with the palm’s full-grown size in mind, clear of overhead lines, roof lines, and fences, with room to spread.
Most palms want full sun and soil that drains well, so avoid low spots that hold water after a summer storm. Once the palm is in, keep beds and mulch off the trunk, as our guide to landscaping around trees explains.
Step 2: Dig the Hole
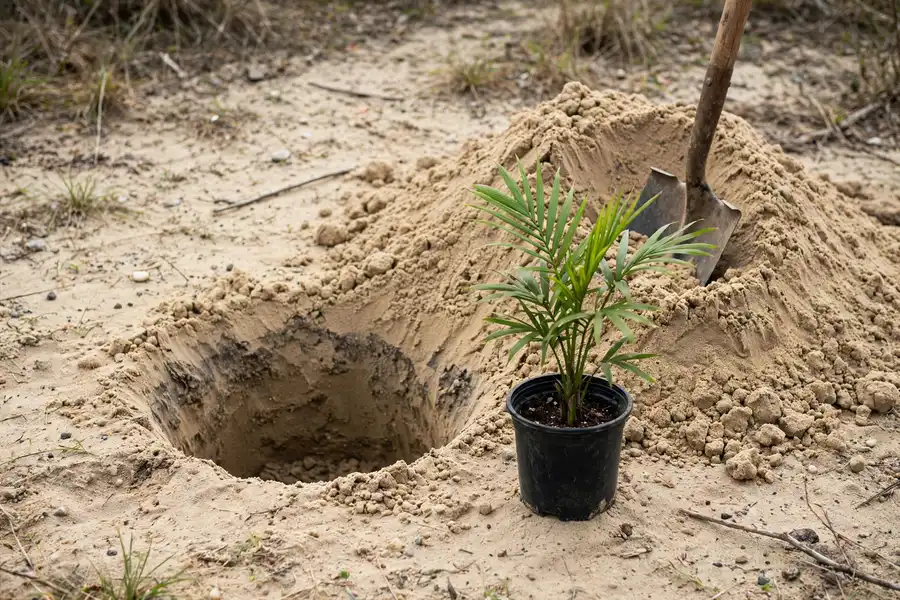
Dig the hole about twice as wide as the container or rootball, but no deeper than the rootball itself. Measure the rootball first, then mark the width on the ground so you do not guess. The extra width gives new roots loose soil to grow into, while the firm bottom keeps the palm from sinking after you water it in.
Save the soil you dig out for backfill, since palms do best in their native soil. Break up large clods as you pile it close to the hole. A wide, shallow hole with a flat, firm bottom is the goal.
Step 3: Set the Depth Right
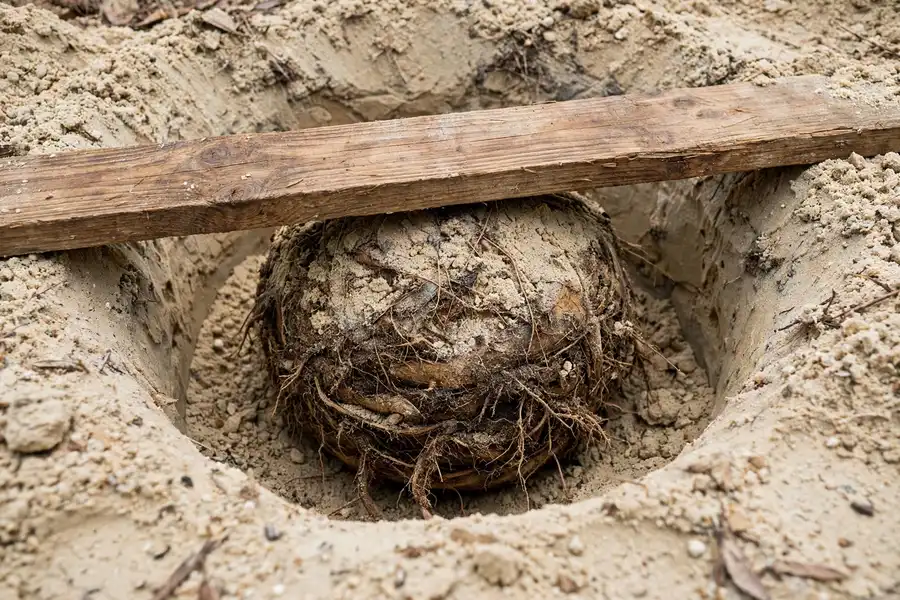
This is the most important step in the whole job. Set the palm so the root-shoot interface, the point where the trunk meets the roots, sits about 1 inch below the soil surface. Lay a board across the hole to check the level before you backfill. The top of the rootball should sit just below the surrounding grade, not above it and not buried deep.
Planting too deep causes real harm. According to UF/IFAS: Transplanting Palms in the Landscape (Broschat), palms planted too deep show more chronic nutrient deficiencies, may attract palm weevils, and can develop root rot. Deep planting is hard to fix later, since lifting a settled palm damages its new roots.
Step 4: Backfill With Native Soil and Water It In
Backfill the hole with the native soil you dug out. Do not mix in compost, potting soil, or other amendments. UF/IFAS found no scientific evidence that amending backfill helps palms, and amended soil can hold water in the hole while surrounding sandy soil drains fast, leaving the rootball sitting wet.
Water as you fill, not only at the end. Run the hose into the hole in stages and let the water wash soil into the air pockets around the rootball. Press the soil gently by hand as you go, but do not stomp it hard. When the hole is full, water once more so the whole root zone is moist.
Step 5: Brace Large Palms the Right Way
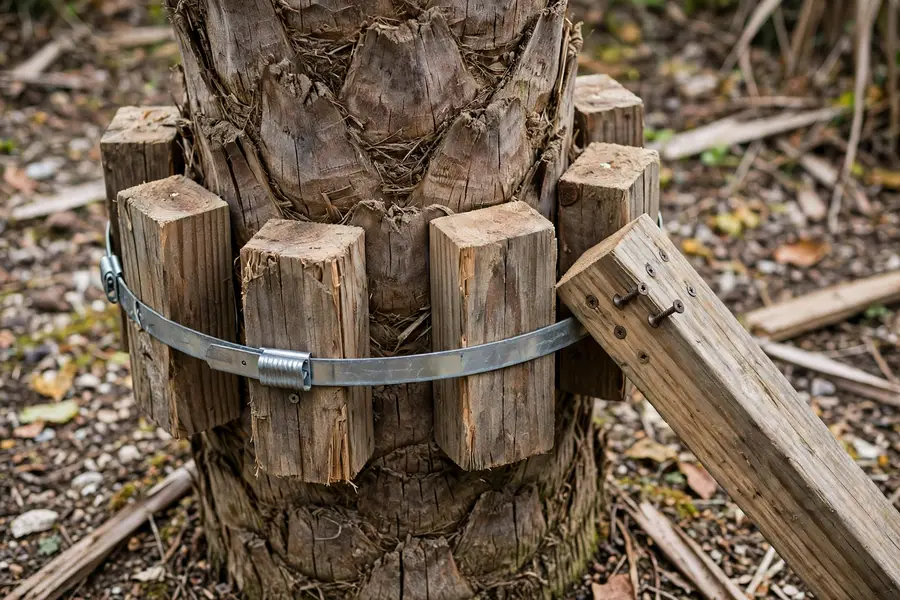
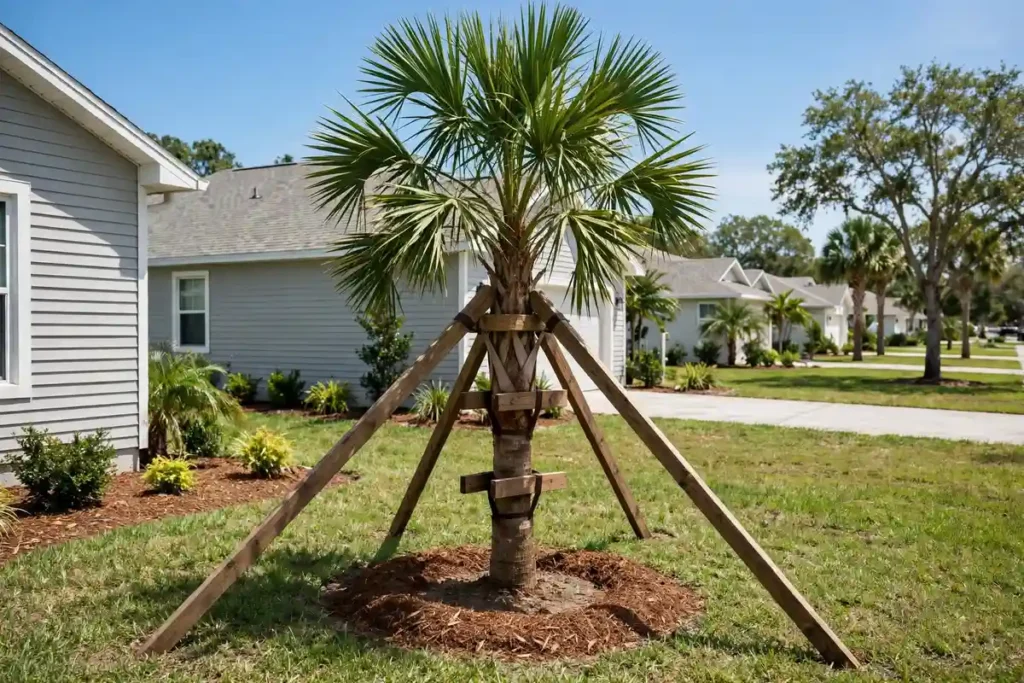
Large palms need bracing until their new roots can hold them steady in a storm. Brace them the right way, or the brace itself can cause lasting damage. Strap short 2×4 pieces, called battens, around the trunk with bands or straps. Then nail or screw the diagonal support timbers to those battens, never into the trunk itself.
Nails driven into a palm trunk leave permanent wounds that never heal the way tree bark does, and those wounds invite pests and decay. Battens spread the pressure and keep the trunk intact. Leave the braces for about a year, per UF/IFAS, then remove them once the palm stands firm on its own roots.
Step 6: Untie the Fronds
Palms often arrive with fronds tied up for transport. Untie them as soon as the palm is in the ground. Tied leaves give no benefit after planting, and UF/IFAS notes they can encourage disease by trapping moisture and blocking air around the crown.
Cabbage palms are the exception. At transplanting, nearly all of a cabbage palm’s cut roots die back, so it cannot support a full crown while it regrows roots. Removing most or all of the leaves at transplanting gave significantly greater survival in UF/IFAS trials. The palm looks bare for a while, but it roots better and pushes fresh growth sooner.
Step 7: Mulch and Water
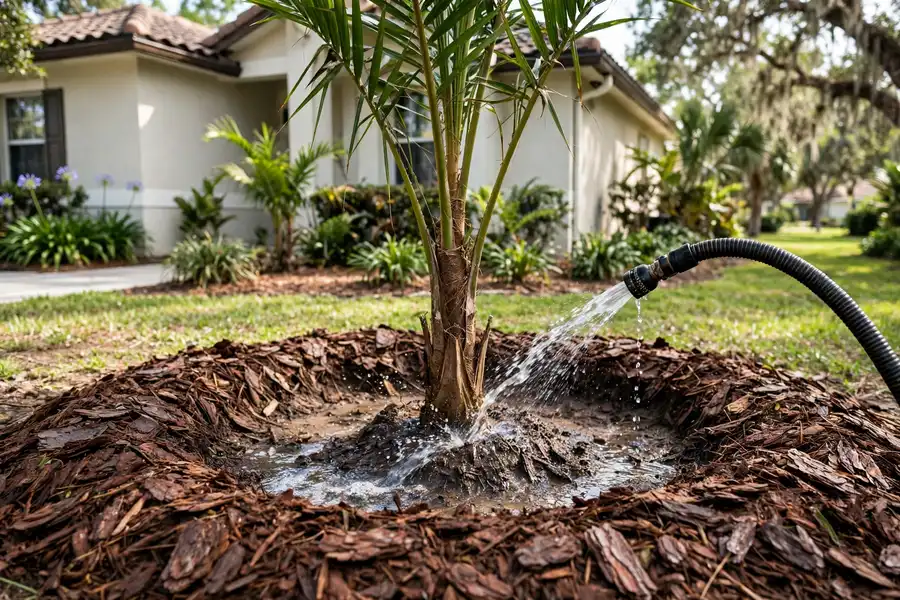
Spread a mulch ring around the palm, but keep it a few inches off the trunk. Mulch piled against the trunk holds moisture on the bark and invites rot and pests. A ring that stops short of the trunk keeps weeds down and holds soil moisture. For topping-up timing, read our guide on how long mulch lasts.
Watering rules differ by palm type. Container-grown palms need water on alternate days during establishment, about 6 to 8 months. Field-grown palms need soil kept uniformly moist but never saturated for the first 4 to 6 months. Check the soil before you water: if it feels soggy, wait, and if the top feels dry, water deeply. Also follow local watering rules for new plantings.
When to Fertilize a New Palm
Do not rush fertilizer. A new palm needs roots first. For container-grown palms, UF/IFAS calls for a high-nitrogen controlled-release fertilizer for the first 6 to 12 months, spread over the rootball and 6 to 12 inches beyond it, where new roots are growing.
For field-grown palms, wait until new shoot growth appears before you start fertilizing. New growth tells you the palm has regrown enough roots to use the nutrients. Flagler County also has fertilizer rules for applying near waterways, so check the current local rules before you spread anything. Our Florida lawn fertilizer schedule explains the seasonal timing for lawns, and the same care applies around palms.
Common Palm Planting Mistakes
Most palm planting failures trace back to a short list of mistakes. Planting too deep tops the list, since it causes nutrient problems and root rot that show up slowly over months. Amending the hole with compost can trap water around the rootball in sandy soil. Nailing braces into the trunk causes wounds that never fully heal.
Leaving fronds tied after planting traps moisture and can encourage disease in the crown. Overwatering into soggy soil is just as harmful as underwatering, since roots need air as well as water. Planting cabbage palms in the dry season, with no rain to help them regrow roots, is another common error. If your palm starts to look weak after planting, check the signs a palm tree is dying so you can act early instead of waiting for the problem to spread.
Palm Installation in Palm Coast
We have planted palms across Palm Coast since 2015, and we follow these same UF/IFAS steps on every install: depth checked with a level, braces strapped to battens, and a watering plan that fits the palm type and season. That care helps a new palm root fast and stand up to Flagler County summer storms.
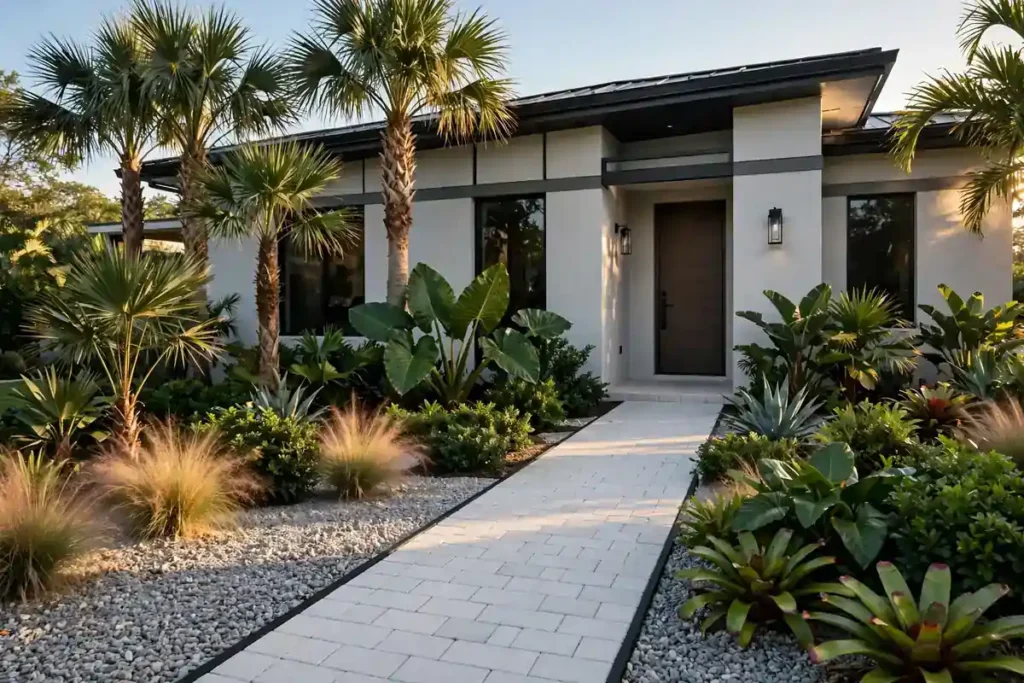
If you want palms as part of a larger yard plan, see our tropical landscape design work for pairing palms with beds, lighting, and walkways. For a new palm install or a full yard project, explore our landscape installation and landscape design services, or reach out for a free estimate. We serve Palm Coast, Flagler Beach, Bunnell, Ormond Beach, and St. Augustine. Call us at (386) 237-2983 and we will help you get your new palm off to a strong start.
Frequently Asked Questions
Set your palm so the top of the root zone, where the trunk meets the roots, sits about 1 inch below the soil surface. Use a board across the hole to check the level before you backfill. Planting deeper is linked to nutrient problems, palm weevils, and root rot, and it is hard to fix later.
Dig the hole about twice as wide as the container or rootball, but no deeper than the rootball itself. The wide hole gives new roots loose soil to grow into, while the firm, undisturbed bottom keeps the palm from sinking after watering. Measure the rootball first so you do not guess at the size.
No. UF/IFAS found no scientific evidence that adding compost or potting soil to the backfill helps palms. Use the native soil you dug out of the hole instead. Water the backfill in stages as you fill, so water washes soil into air pockets around the rootball and the palm settles at the right depth.
Leave braces on for about a year, per UF/IFAS, until new roots can hold the palm steady on their own. Strap short 2×4 battens around the trunk with bands, then attach the diagonal braces to those battens. Never nail supports into the trunk itself, since those wounds never heal and invite pests and decay.
For container-grown palms, water on alternate days during establishment, which lasts about 6 to 8 months. For field-grown palms, keep the soil uniformly moist but never saturated for the first 4 to 6 months. Check the soil before watering: if it feels soggy, wait, and if the top feels dry, water deeply.
The rainy season, June through November, gives most Florida palms their best chance at survival after transplanting, according to UF/IFAS. Warm soil and regular rain help new roots grow fast. Container palms can go in at other times of year, but only with careful, steady watering until they are established.