Drive through the older streets off Palm Harbour Parkway, and you’ll spot them — flat slabs of stone set into the ground, some tight and square, others loose and irregular with moss creeping through the joints. That’s flagging. It’s one of the oldest ways to put a floor on a yard, and after twenty-plus years of building outdoor spaces around Flagler County, it’s still the finish homeowners ask us about most once they’ve seen it done right.
This guide covers what a flagging garden actually is, which stones survive Florida summers, how the layouts differ, and what the work costs around here.
What Does Flagging Mean in a Garden?
Flagging means laying flat stone slabs — called flags or flagstones — across the ground to build a patio, a path, a seating pad, or a border around a pool. The word comes from the trade. A mason “flags” an area the same way a carpenter frames a wall.
Flagstone splits naturally into thin sheets, so each piece has a slightly different edge, thickness, and color. That irregularity is the whole appeal. Where poured concrete reads as one flat surface, a flagged area reads as a collection of pieces fitted together. If you’re still weighing stone against planting beds and lawn, our breakdown of hardscape versus softscape explains how the two sides of a yard balance each other.
Why Flagging Suits Florida Yards
Grass struggles in the shade under a live oak. It struggles again in the strip beside a driveway where the sprinklers barely reach. Homeowners reseed those spots every spring and get the same bare dirt by August. Flagging solves the problem permanently by taking the area out of the lawn-care rotation entirely.
Stone also handles our rain better than most people expect. A sand-set flagged patio lets water pass through the joints instead of sheeting toward the house, which matters in a county that can pick up several inches in a single afternoon storm. Add in low upkeep and the fact that stone doesn’t rot, warp, or need staining, and it’s easy to see why so many of the hardscaping projects we build around Palm Coast homes start with flagstone.
Picking Stone That Holds Up Near the Coast
Not every flagstone belongs in zone 9a or 9b. A few notes from the field:
- Travertine stays noticeably cooler underfoot than darker stone, which is why it shows up around so many pools here. It’s porous, so it wants a sealer.
- Bluestone looks sharp and wears like iron, but a dark slab in July sun will cook bare feet. Save it for shaded paths.
- Sandstone in buff and tan tones reflects heat well and matches the coquina-colored homes common along A1A.
- Concrete flags cost less and come in consistent sizes, though they fade faster than natural stone.
If your property sits east of the Intracoastal, salt spray is a real factor. Choose a denser stone, seal it, and keep the planting around it salty-air tolerant — we keep a running list of salt-tolerant plants that actually survive Florida coastal yards.
Four Flagging Layouts Worth Considering
Irregular flagging. Broken, natural-edge pieces fitted together like a puzzle, sometimes called crazy paving. It looks relaxed and forgiving, and it hides the settling that sandy soil eventually causes. Best for informal back gardens and side paths.
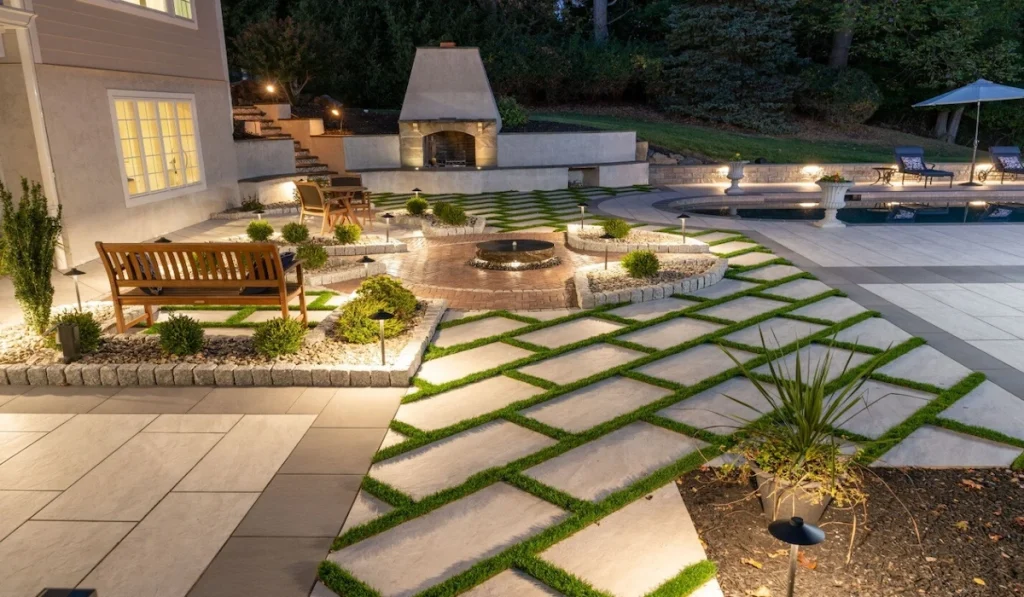
Cut rectangular flags. Squared pieces in one or two repeating sizes, laid in a running bond or an ashlar pattern. Cleaner, more architectural, and a good match for newer builds in Grand Haven or the Conservatory.
Stepping flags through planting. Individual slabs spaced a comfortable stride apart with dwarf mondo grass, creeping jenny, or river rock filling the gaps. This is the cheapest way to bring flagging into a yard, and it reads beautifully. Our guide to garden pathway and walkway designs covers spacing and edging in more detail.
Circular flagging. A radial pattern built around a fire pit, a fountain, or a specimen palm. It takes more cutting and costs more per square foot, but it gives a garden a clear center.
Sand-Set or Mortared?
Two ways to build it, and the choice changes the price and the lifespan.
Sand-set flagging goes over a compacted base with a bedding layer of sand or stone dust. Joints get filled with polymeric sand or gravel. It’s flexible, it drains, and a settled slab can be lifted and reset in an afternoon. For most residential yards, this is what we recommend.
Mortared flagging sits on a concrete slab with mortar between the stones. It’s rigid, weed-free, and the right call around pool decks and anywhere a wheelchair or stroller needs a dead-flat surface. It also costs more and cracks if the slab underneath moves. The same logic applies when you’re landscaping around an existing paver patio — the base decides how the surface ages.
Base Prep and Drainage Come First
This is where most flagging jobs succeed or fail, and it’s the part nobody photographs.
Our soil is sand. Sand shifts. A flagged patio built straight on graded dirt will look perfect for a season and then start rocking and dipping. Proper prep means excavating six to eight inches, compacting a crushed base in lifts, then screeding the bedding layer flat.
Slope matters just as much. Pitch the surface about an eighth of an inch per foot away from the house so storm water runs off instead of pooling at the slab edge. If the area already holds water after a heavy rain, fix that before any stone goes down — a properly built French drain tied into a low point will save you from rebuilding the patio in three years.
What Flagging Costs Around Flagler County
Installed pricing for flagstone in this area generally runs between $18 and $35 per square foot, depending on stone type, pattern, and how much cutting the design demands. Irregular flagging on sand sits at the lower end. Mortared travertine with a cut border sits at the top.
A 300-square-foot back patio, then, lands somewhere in the $6,000 to $10,000 range for most homes. Access, demolition of an existing slab, and drainage work all move that number. We’ve laid out the full picture in our hardscape cost breakdown if you’re building a budget.
Keeping Flagstone Looking Right
Humidity means algae. A north-facing flagged path under tree cover will green up within a year or two — that’s normal, not a defect.
Sweep it monthly. Rinse it with a hose. Once a year, wash it with a dedicated stone cleaner and a soft-bristle brush. Skip the 3,000 PSI pressure washer on soft sandstone or travertine; it strips the surface and leaves permanent wand marks. Reseal porous stone every two to three years. Our walkthrough on cleaning pavers and hardscapes covers safe pressure ranges and which cleaners won’t kill nearby plants.
Mistakes We Get Called In to Fix
- Stone laid directly on sand with no compacted base underneath
- No slope, so rainwater sits against the foundation
- Flags cut too thin — anything under an inch and a half will crack under foot traffic
- Joints packed with regular play sand, which washes out with the first storm
- Dark stone chosen for a full-sun pool deck
- Edges left unrestrained, so the outer flags slowly creep outward
Ready to Start Your Flagging Project?
Dreamscapes Florida designs and installs flagstone patios, paths, and pool surrounds across Palm Coast, Bunnell, Flagler Beach, Ormond Beach, and St. Augustine. We handle the base, the drainage, and the stonework as one job, so nothing gets passed between trades. Take a look at our hardscape services or call us to walk the yard and talk through what fits your space and budget.
Flagging Garden FAQs
Foot traffic areas need at least one and a half inches. Anything carrying vehicle weight needs two inches or more, set on a proper base.
A short stepping-stone path, yes. A full patio involves excavation, compaction, screeding, and cutting stone with a wet saw — most homeowners underestimate the base work and pay for it later.
Some, in sand-set installs. Polymeric sand cuts it down significantly, and a quick pass with a joint knife twice a year handles the rest.
Light-colored travertine and buff sandstone stay comfortable. Dark bluestone and slate do not — keep those to shaded areas.
Built on a compacted base with proper drainage, thirty years or more. Built on bare sand, expect to be resetting stones within five.
Fall and winter are ideal here. Drier ground compacts better and the crew isn’t fighting afternoon thunderstorms.
Excavate six to eight inches, compact a crushed stone base in two or three lifts, screed a bedding layer flat, then pitch the surface about an eighth of an inch per foot away from the house for drainage.
No. Slabs set straight on soil will rock, sink, and shift within a season — especially in Florida’s sandy ground. You need a compacted crushed base underneath, then a bedding layer of sand or stone dust.