Wood decks are a valuable extension of the home, providing an outdoor retreat for relaxation, socialising, and family time. However, exposure to the elements over time can cause wood to fade, crack, splinter, or become weathered. If your deck has seen better days, refinishing it can breathe new life into your outdoor space.
This guide will walk you through everything you need to know about how to refinish a wood deck, including preparation, sanding, staining, and sealing. Whether you’re wondering how to restain a deck, looking into wood deck restoration, or asking yourself how to refinish a deck that has been painted, you’ll find all the answers here.
Why Refinish a Deck?

Wood naturally deteriorates with prolonged exposure to sunlight, moisture, and fluctuating temperatures. The UV rays from the sun bleach the wood, rain seeps into cracks, and winter temperatures can cause expansion and contraction that leads to splitting or warping.
Without proper maintenance, what was once a beautiful wood deck can start to look dull, dirty, and even become hazardous due to loose boards or splinters. Deck restoration not only enhances the appearance of your outdoor area but also extends the life of the wood and protects your investment. Regular deck refinishing is key to preserving the integrity and beauty of any wooden deck.
When Should You Refinish Your Deck?
Determining the right time to refinish a deck depends on several factors. If your deck’s finish is peeling, fading, or absorbing water rather than repelling it, it’s time to re-stain the deck. Another test is the splash test: pour water on the deck boards. If the water soaks in rather than beads up, the wood is unprotected and needs attention.
Typically, decks should be restained every 2 to 3 years, though this can vary depending on sun exposure, climate, and the quality of the previous finish. The best time of year to stain a deck is during spring or early fall when temperatures are moderate, humidity is low, and there’s no rain in the forecast.
Preparing Your Deck for Refinishing
Preparation is the most crucial step in the deck refinishing process. Before you can apply any new finish, the deck must be cleaned, stripped & sanded to ensure proper adhesion and a smooth final result. If you skip these steps, the new stain or sealant may not penetrate or adhere correctly, leading to peeling or uneven colour.
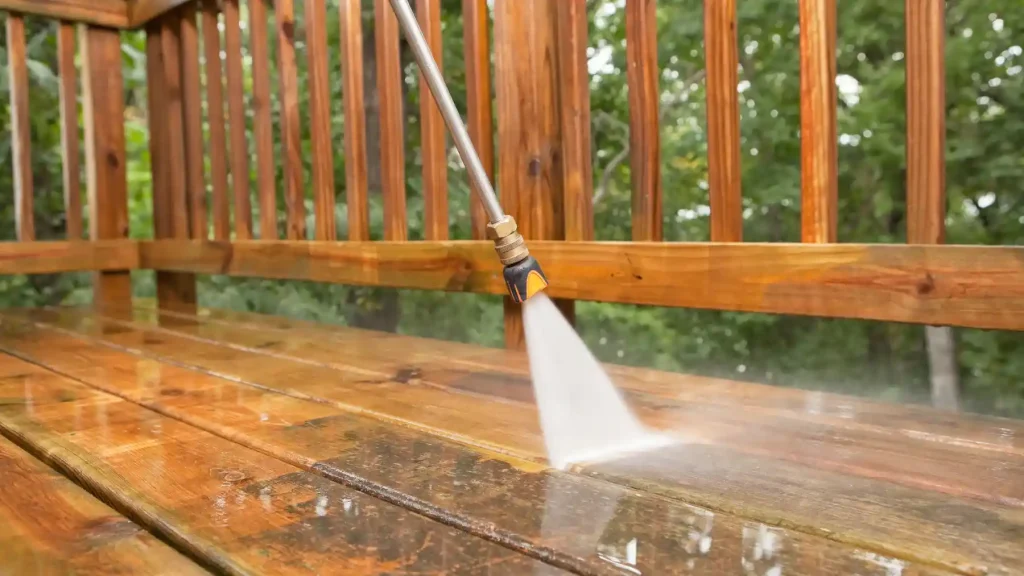
Start by removing furniture, grills, or any items from the deck. Next, sweep away dirt and debris. If the deck has mildew or mould, you’ll need a wood cleaner specifically designed to remove organic buildup. If a previous finish or paint is flaking or chipping, use a deck stripper to remove the old coating. Products labelled ‘deck stripping’ or ‘restore-a-deck’ are often used for this purpose.
If the deck was painted, consider stripping it entirely before restaining, especially if the finish is severely cracked or blistered. This step will allow the new stain to absorb evenly into the wood. Many homeowners ask how to strip a deck of paint, and the answer lies in using chemical strippers followed by a thorough rinse with a pressure washer.
Sanding the Deck
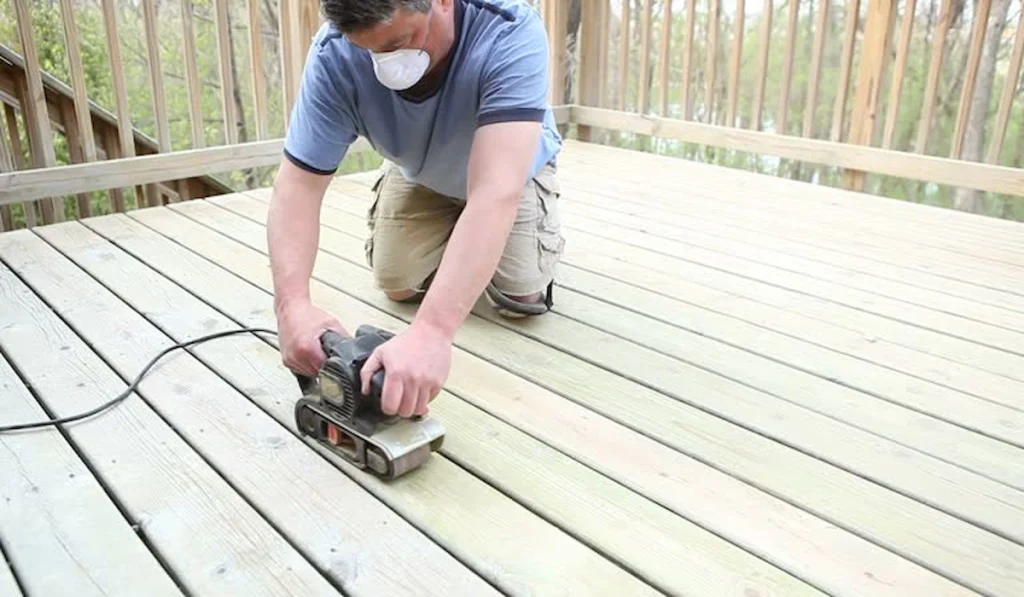
After cleaning and stripping, sanding the deck is necessary to smooth the wood and open its pores for better stain absorption. Sanding also removes any lingering bits of old stain, grime, or fibres raised by the washing process. Whether you’re working on a new deck that needs finishing or you’re restaining a deck that’s 10 years old, sanding will make a significant difference.
Sanding a deck for staining should be done with an orbital sander or a drum sander. For best results, use a grit between 60 and 80. Many wonder which grit of sandpaper is best for deck refinishing—60 grit is aggressive enough to smooth the surface and remove imperfections without damaging the wood. Hand sanding may be needed for tight corners, railings, or hard-to-reach spots. Always sand in the direction of the grain to avoid scratching or gouging the wood.
If you’re asking, can you sand deck boards? The answer is yes—and you should. This helps remove splinters and gives the surface a uniform texture. Remember to sweep or vacuum the deck afterwards to thoroughly remove dust.
Choosing the Right Stain or Sealer
There are many types of stains available, and choosing the right one is essential to achieving the look and protection you want. Stains range from transparent to solid, with options in between, such as semi-transparent and semi-solid.
A transparent stain will allow the wood’s natural grain to show through, but it will need to be reapplied more frequently. A solid stain, on the other hand, offers better UV protection and can mask imperfections but may obscure the wood grain.
For restoring a weathered deck, semi-transparent or solid stains work well, providing colour and protection while hiding worn spots. If you’re wondering how to restain an old deck, start by assessing the wood’s condition and choosing a stain type that suits your needs. Oil-based stains tend to penetrate deeper into the wood, offering longer-lasting protection, while water-based stains are easier to clean up and more environmentally friendly.
How to Restain a Deck
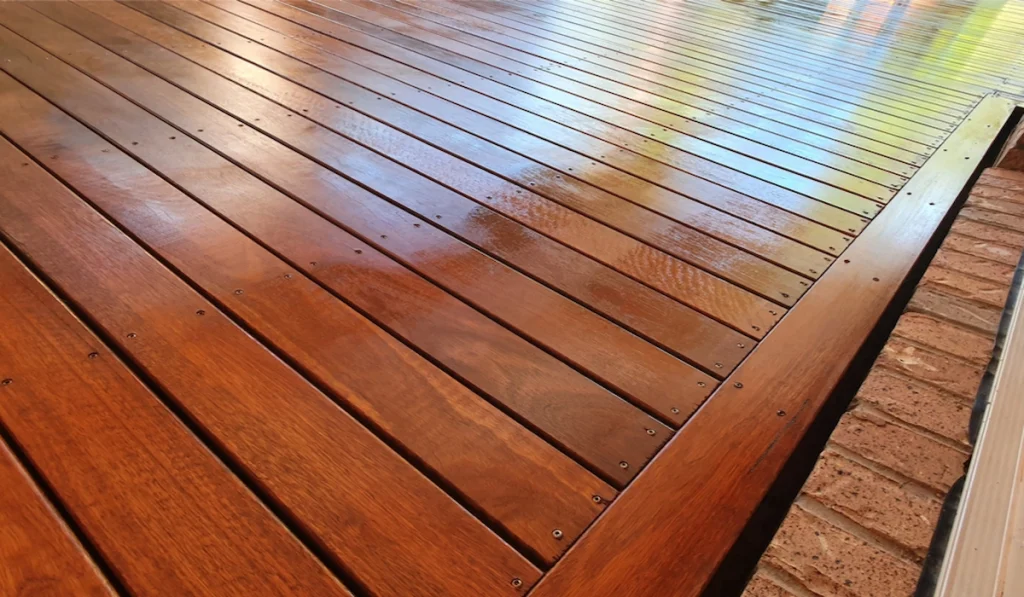
With a clean, dry, and sanded surface, you’re now ready to restain the deck. Before applying the stain, check the forecast to ensure dry weather for at least 48 hours. Humidity and rain can prevent the stain from curing properly.
Apply the stain using a brush, roller, or stain pad. Some homeowners also use a sprayer, especially for large decks. Work in small sections to maintain a wet edge and avoid lap marks. Always apply the stain in the direction of the wood grain and avoid oversaturating the surface. In most cases, one coat is sufficient, especially for semi-solid or solid stains.
If you’re working with a more transparent formula or if the wood is especially thirsty, a second coat might be needed. Be sure to follow the manufacturer’s instructions for drying and curing times.
If you’re asking how to restain a deck without stripping, it’s possible only if the existing stain is in good shape and you’re using a compatible product. However, the new stain may not adhere well if the old coat is peeling or uneven, so it’s usually better to strip the old layer first.
Sealing and Protecting the Wood
After staining, sealing the deck is the next step in the deck restoration process. Some stains can be sealed, while others require a separate sealing step. A sealer acts as a barrier, protecting the wood from moisture and UV damage. Applying a sealer will help your finish last longer and resist mildew, cracking, and fading. Make sure the stain has dried thoroughly before applying any sealant.
If your deck sees heavy foot traffic or extreme weather, this step becomes even more critical. Products labelled deck restore stain or wood deck restorer often include built-in sealants and rejuvenators designed for aged wood. Reapplying sealant every year or two, depending on usage and climate, will help keep your deck in top condition.
Cost to Refinish a Deck
Many homeowners want to know the cost to restain or refinish a deck, and while prices vary, you can estimate based on materials and labour. DIY deck refinishing is much more cost-effective than hiring a professional, though it requires more time and effort. Expect to spend between $100 and $400 on stain, sealer, sandpaper, and cleaning products. Renting sanding equipment can cost an additional $50 to $100 per day.
If you hire a professional, the cost to sand and stain a deck ranges from $2 to $5 per square foot. Additional fees may apply for repairs, paint stripping, or heavy restoration. The overall cost to refinish a wood deck will also depend on the deck’s size, condition, and the products you choose.
Tips for a Long-Lasting Finish
To ensure your newly refinished deck stays beautiful, perform regular maintenance. Sweep it frequently to remove leaves and debris that can trap moisture. Clean the surface with a deck cleaner every few months to prevent mildew buildup.
Reapply stain or sealant as needed based on wear and weather conditions. Avoid dragging furniture or sharp objects across the deck surface to reduce the risk of scratches.
If you’re asking how often you should restain a deck, plan on every 2 to 3 years for semi-transparent stains and 3 to 5 years for solid stains. Weather, foot traffic, and product quality all play a role in how long your finish will last.
Alternatives to Refinishing: Resurfacing and Painting
In some cases, resurfacing a deck may be a better option than refinishing, especially if the wood is severely damaged. Resurfacing involves installing new deck boards over the existing frame. This method can completely transform your deck’s look without a complete teardown. Wood deck resurfacing options include composite materials that offer better durability and require less maintenance.
Alternatively, painting a deck with Restore or another thick coating product can provide a durable, textured finish that fills in cracks and covers imperfections. These products are often used when refinishing a wooden deck that’s beyond traditional staining but still structurally sound.
Conclusion
Learning how to refinish a wood deck can be a rewarding DIY project that improves the appearance and longevity of your outdoor space. Whether you’re tackling a complete deck restoration, planning to restain cedar deck boards, or just looking to redo your deck, the process requires careful preparation, quality materials, and attention to detail. With the right approach, even the most weathered deck can look like new again.
Deck maintenance isn’t just about aesthetics—it’s a crucial step in protecting the investment you’ve made in your home. From sanding a deck before staining to sealing it for weather protection, each step contributes to the deck’s overall durability. Now that you know how to refinish your deck, you’re equipped to take on the task with confidence and create an outdoor space you’ll enjoy for years to come.